Customizing your activity
In the last step of the New Project wizard, you can customize a little bit of your activity. This customization is going to determine the names of some of your classes and resources files. You can also customize from this wizard the use of fragments or the navigation type.
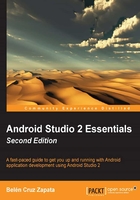
The following screenshot shows the customization screen for an Empty Activity:

The basic customization for the activity has the following options:
- Activity Name: Name of the main activity class.
- Layout Name: You can create a layout for your activity if you check the Generate Layout File option. This field lets you specify the name of the layout associated with your main activity, which will be created in the resources folder.
Depending on the type of activity selected in the previous steps, you can customize more parameters. The following screenshot shows the customization of Basic Activity:

In addition to the activity and layout names, you can configure the following options:
- Title: This will be used for the activity and in the action bar by default.
- Menu Resource Name: The name of the resource file that configures the menu items.
There are other customizations that are available only to one type of activity, such as AdMob Ads Activity and Tabbed Activity. The AdMob Ads Activity contains one additional option, Ad Format, which is the format of the ad. Format can be Interstitial or Banner. The Tabbed Activity includes two additional options: Fragment Layout Name, which is the name of the layout associated with the activity's content fragment; and Navigation Style, which is the type of navigation. You can choose to navigate by any of the following three alternatives:
- Swiping the views (Swipe Views) as shown in the next screenshot:

This type of navigation uses a
ViewPagercomponent to display the fragments. TheViewPagerobject is configured, in the main activity, with aSectionsPagerAdapterobject. It provides the fragments that theViewPagerneeds. In addition to the main layout that contains aViewPager, a fragment layout is also created:fragment_main.xml. - Tabs in the action bar (Action Bar Tabs) as shown in the next screenshot:

This type of navigation uses the same components and files as the Swipe Views navigation type, plus a
TabLayoutobject. TheTabLayoutobject needs to receive theViewPagerobject, which is set in theonCreatemethod of the main activity:TabLayout tabLayout = (TabLayout) findViewById(R.id.tabs); tabLayout.setupWithViewPager(mViewPager);
- Using a spinner in the action bar (Action Bar Spinner) as shown in the next screenshot:

This type of navigation uses a
Spinnercomponent to display the fragments. TheSpinnerobject is configured, in the main activity, withThemedSpinnerAdapter. It provides the fragments that theSpinnerneeds. In addition to the main layout that containsViewPager, a fragment layout is also created:fragment_main.xml.
To complete this chapter, we select Empty Activity. Retain the default values in the customization and click on Finish.
An Empty Activity will be created in your project. This activity is also configured as the main activity of your application in the AndroidManifest.xml file by setting the following intent filter action:
<activity
    android:name=".MainActivity"
    android:label="@string/app_name" >
    <intent-filter>
        <action android:name="android.intent.action.MAIN" />
        <category android:name="android.intent.category.LAUNCHER" />
    </intent-filter>
</activity>
The android.intent.action.MAIN action sets the activity as the main entry point of your application. The android.intent.category.LAUNCHER category indicates that the entry point should appear as a top-level application in the launcher. We will examine this AndroidManifest.xml file in Chapter 3, Navigating a Project.